Showing posts with label Windows. Show all posts

Thursday, November 20, 2014

Want to know about your windows OS something deeper..?


How to find system information with different options

1. View "About Windows" in Windows 8 and 8.1

Open run and type "winver"

It will show windows build version and some other information about your OS


2. View "PC info" in PC settings in Windows 8.1

This will show windows produsct id and some other information

Press win+c...then select settings...then pc and devices..then pc info


3. View "System" in Windows 8 and 8.1

Right click on windows tile then select system

it will show windows and ram version details and activation details

You can open "SYSTEM Details" by pressing
win+pause/break buttons


4.View "System Information" in Windows 8 and 8.1

Open run and type "msinfo32"

It will show you system total information

5. To Display Detailed License Information about Windows

Open cmd and type "slmgr /dlv"


6.View System Information in Command Prompt


open cmd type "systeminfo"

it will show your system info


7. Last and but not least

Want to know abut DirectX verion and some other information about your PC

Open run and type Dxdiag and enter


www.youtube.com/user/techcrunch324


For video tutorial


Monday, November 17, 2014

How to Fix Corrupt PST files in MS Outlook

If you are the victim of corrupt PST files or Outlook popping errors or its running excessively slow, then you must repair the Outlook PST files before its too late. Today most likely people use Microsoft Outlook often to send and receive mails. Due to its Flagship product from Microsoft Office, it makes the primary tool for email. It’s not just an application for managing your email but also your contact, your calendar, your tasks and notes, which are very important and cannot think of losing it. To repair or recover mails from such corrupted PST files, there are many software available, but you may have to chunk out some money from your pocket. However, before trying any paid tool to repair your PST file, try Microsoft in-built PST Scan and Repair tool called SCANPST.

What is Outlook PST Files?

Microsoft Outlook use PST files to store Outlook data, including your mails, email folder, tasks and notes, contacts and other personal data. PST Files are also known as Personal Folders and Outlook Data File.

How to Repair or Fix Corrupt PST Files

Microsoft provides the PST Repair Tool for fixing most of the problem with damaged personal folder i.e. PST Files. In order to repair your corrupted or damaged PST files, we would need to open Scanpst.exe utility that’s included by default with Outlook. This tool can also be used for email recovery while fixing the corrupt PST Files. However, accessing this tool is a bit troublesome since there is no easy shortcut to it, so you’ll need to find in Outlook Folder.

Scanpst.exe utility to repair corrupt PST files

For Outlook 2010, Open the below path in explorer to find Scanpst.exe utility tool.
C:\Program Files\Microsoft Office\Office14
For Outlook 2007, Open the below path in explorer to find Scanpst.exe utility tool.
C:\Program Files\Microsoft Office\Office12
For Outlook 2003 or earlier, Open the below path in explorer to find Scanpst.exe utility tool.
C:\Program Files\Common Files\System\Mapi\1033
C:\Program Files\Common Files\System\MSMAPI\1033
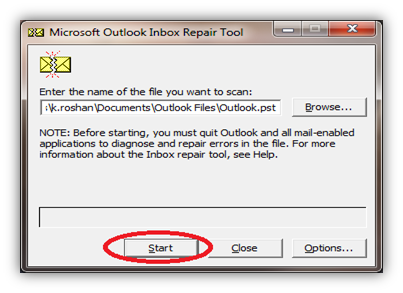
Step 1: Open the Scanpst.exe utility, Click on Browse and select your corrupted or damaged PST File. If you are not sure about the location of your PST Files then check below for default location of PST Files.
Windows XP
  • Outlook 2007 and previous
    C:\Documents and Settings\%username%\Local Settings\Application Data\Microsoft\Outlook\
  • Outlook 2010
    C:\Documents and Settings\%username%\My Documents\Outlook Files\
Windows Vista and Windows 7
  • Outlook 2007 and previous
    C:\Users\%username%\AppData\Local\Microsoft\Outlook\
  • Outlook 2010
    C:\Users\%username%\Documents\Outlook Files\
Step 2: Click on Start to scan the PST File
scan corrupt PST files
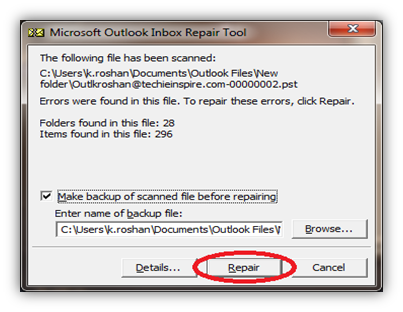
Step 3: Once Scan is completed. It will display the scanning report. If there is any issue, then it may ask you to click on the repair button in order to repair the PST file. You can also click on Details… button for more information about the error in PST File.
repair corrupt PST files
If everything goes well, you will see “Repair Complete” dialog box. Click on OK and Open Outlook. You might now be able to open your outlook with your exciting PST File. In case it fails to Repair then try again to repair the Corrupt PST File. If it again fails, you might want to try some other popular tools, which are available at very low price

Sunday, November 16, 2014

How To Turn On your Computer Using Keyboard Or Mouse

1. Power on your system and Press F2 or Delete to access BIOS setup screen.
2. Select Power Management or Integrated Peripherals and look out for the options “Power on By Keyboard” or “Power on by Mouse”

Turn On your Computer Using Keyboard Or Mouse

3. If you want to Power your system using keyboard then select “Power on By Keyboard”. You will see below two options to enable,
  • Password: If you want to Power On your system using the keyboard, then select “Power on By Keyboard”. You will see below two options to enable.
  • Keyboard 98: This can be selected for older models of keyboard.
Turn On your Computer Using Keyboard

If you want the system to Power On using the mouse, then select “Power on by Mouse” and select Double click option.

Turn On your Computer Using Mouse

Once the setting is configured, press F10 to save the BIOS settings and Exit. In order to test, shut down your computer and press the assigned key to Power On / Turn On your computer using keyboard and mouse. System would generally be Power On without pressing the power button on CPU/tower.

How to Fake processor name

How to Fake processor name

Step 1: Go to Start –> Run –> Type "Regedit" and Press Enter.

Step 2: In Regedit, Navigate to HKEY_LOCAL_MACHINE –> HARDWARE –> DESCRIPTION –> System –> Central Processor –> 0.

Step 3: Now, On right Pane (Right Side), Find "ProcessorNameString" in name column.

Step 4: Now, Double-Click on "ProcessorNameString" and modify its value data. Change the Value Data as you wish. After Changing the value Date, Press Ok.This detail will be shown on system properties.

Note: This Changes are temporary. If you restart your System or PC, it will change to default which you had earlier.


For Video tutorial


Tuesday, November 11, 2014

How to Enable Copy paste in CMD – Windows

By Default Windows do not allow users to Copy text and Paste it in Command prompt Or Copy text from Command prompt and paste it elsewhere. But there is an option in CMD itself to enable Copy & Paste Text in Windows Command Prompt.
Today in this tutorial we will learn how to “Enable Copying and Pasting Texts in Windows Command prompt”. One of the main advantage of this will be that you can copy any command that you find on the internet or from any word/excel file and paste it directly in CMD and execute that command just like that.
How to Enable Copy Paste in CMD
Step 1: Open CMD, Just type CMD in search or Press Win + X key to select Command Prompt.
Step 2: Right Click on the Title of the CMD window and Select Properties just like its shown in the below Picture


 Step 3: You will see a Pop up Window coming up, Now on the Right hand side, Under Edit Options, Just Check Quick Edit Mode and click OK
Step 4: Everything is Done, Now just Copy any Text from Here or Anywhere else Using CTRL + C keys and just Right click using your mouse on CMD. You will see that the text is been pasted automatically in CMD. Please Understand that Using CTRL + C to Copy text is Important.
Likewise if you wish to Copy Text from CMD to paste elsewhere then Just Select the Text in CMD and Again just Right Click with the mouse. Your Text is Copied and ready to Paste it in any Document you want.
This Doesn’t Limit you to just Text you can even copy File or Folder path and paste it in CMD. Everything that you have to type manually can be copied from somewhere and pasted directly to CMD with this small Tweak

So this was just a small Tip I wanted to Share with my Readers so that you don’t have to Type any long Command in CMD which if typed incorrectly can cause errors. I hope this will help some of you.

Sunday, November 9, 2014

How to download and install Windows Appstore apps directly without appstore

How to download & install Windows Appstore apps directly without appstore


1. Download & install Fiddler2 ( http://www.telerik.com/fiddler )


2. You need to select Win8 Config

3. Click Exempt All then click Save changes

4. Now open Appstore

5. Select which app going to install

6. Here i'm going to download Hill Climb Racing

7. Click install

8.Now open Fiddler2

9. You can find downloading in fiddler

10. right click on that and copy just URL

11. Paste that URL in any download manager

12. Now your Download manager will download that App

13. After completion of Download i'll get back

14. Now downloading completed

15. Now we are going to install that app

16. Open Powershell

17. i'm changing app name to Hill climb

18.Now execute "add-appxpackage app.zip" in power shell

19. Oh sorry my bad Actually we need to give single word name

20. Now our app going to install

It'll take some time

Now execution completed

Lets check the game


Video tutorial:


Wednesday, November 5, 2014

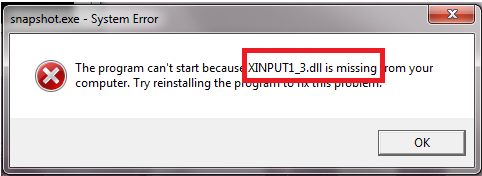
Windows Xinput1_3 error fix


1. Download latest DirectX from Microsoft site (It's free)
2. Install
3. try to run your game

For video tutorial


How to Clean Up the WinSxS Folder in Windows

winsxs show

How to Clean Up the WinSxS Folder in Windows

One commonly asked question is can I delete the WinSxS folder to regain some disk space? The short answer is no. However, there are ways to reduce the size of the WinSxS folder. This topic was written to provide information about the different ways to reduce the size of the WinSxS folder on a running version of Windows 8.1.
Windows 8.1 and Windows Server 2012 R2 automatically reduces the size of the WinSxS by using methods similar to the ones described in this topic, however these methods also include internal processes, such as uninstalling and deleting packages with components that have been replaced by other components with newer versions. Previous versions of some components are kept on the system for a period of time, allowing you to rollback if necessary. After a period of time, these components are removed from the installation.
Warning:
Deleting files from the WinSxS folder or deleting the entire WinSxS folder may severely damage your system so that your PC might not boot and make it impossible to update.
In Windows 8.1 and Windows Server 2012 R2, you have a number of ways to start the cleanup of the component store, which use a combination of package deletion and component compression to clean up the WinSxS folder:
Task Scheduler:
The StartComponentCleanup task was created in Windows 8 to regularly clean up components automatically when the system is not in use. This task is set to run automatically when triggered by the operating system. When run automatically, the task will wait at least 30 days after an updated component has been installed before uninstalling the previous versions of the component.
If you choose to run this task, the task will have a 1 hour timeout and may not completely clean up all files.
Run the StartComponentCleanup task in Task Scheduler to clean up and compress components
  1. If Task Scheduler is not open, start the Task Scheduler.
  2. Expand the console tree and navigate to Task Scheduler Library\Microsoft\Windows\Servicing\StartComponentCleanup.
  3. Under Selected Item, click Run
Note:
 The StartComponentCleanup task can also be started from the command line: schtasks.exe /Run /TN “\Microsoft\Windows\Servicing\StartComponentCleanup”
Dism.exe:
Deployment Image Servicing and Management (DISM) is a command-line tool that allows you to install, uninstall, configure, and update Windows features, packages, drivers, and international settings. The /Cleanup-Image parameter of Dism.exe provides advanced users more options to further reduce the size of the WinSxS folder. For more information, see DISM Operating System Package Servicing Command-Line Options.
Use the /StartComponentCleanup parameter
  1. Using the /StartComponentCleanup parameter of Dism.exe on a running version of Windows 8.1 gives you similar results to running theStartComponentCleanup task in Task Scheduler, except previous versions of updated components will be immediately deleted (without a 30 day grace period) and you will not have a 1-hour timeout limitation.
From an elevated command prompt, type the following:
Dism.exe /online /Cleanup-Image /StartComponentCleanup
Use the /ResetBase switch with the /StartComponentCleanup parameter
  1. Using the /ResetBase switch with the /StartComponentCleanup parameter of DISM.exe on a running version of Windows 8.1 removes all superseded versions of every component in the component store.
From an elevated command prompt, type the following:
Dism.exe /online /Cleanup-Image /StartComponentCleanup /ResetBase
Warning:
All existing service packs and updates cannot be uninstalled after this command is completed. This will not block the uninstallation of future service packs or updates.
Use the /SPSuperseded parameter
  1. To reduce the amount of space used by a Service Pack, use the /SPSuperseded parameter of Dism.exe on a running version of Windows 8.1 to remove any backup components needed for uninstallation of the service pack. A service pack is a collection of cumulative updates for a particular release of Windows.
From an elevated command prompt, type the following:
Dism.exe /online /Cleanup-Image /SPSuperseded
Warning:
The service pack cannot be uninstalled after this command is completed
Disk Cleanup:
You can use Disk Cleanup to reduce the number of unnecessary files on your drives, which can help your PC run faster. It can delete temporary files and system files, empty the Recycle Bin, and remove a variety of other items that you might no longer need. The option to cleanup updates helps reduce the size of the component store.
Run Disk Cleanup to delete system files
  1. To delete system files run the steps as provided in Delete files using Disk Cleanup.

Friday, October 31, 2014

Wednesday, October 29, 2014

How to fix .Net issue in Windows 8 or 8.1

How to fix .Net issue in Windows 8 or 8.1

Actually we can fix this in 2 ways

One with internet.....another without internet

i'll show you both the methods

1. control panel--Programs and feature--Turn on Windows features--select .Net 3.5 then click OK

It'll search for required files..and it will automatically download and install-It requires internet

This is the first method

Now i'll show you offline method

1. Insert Windows 8 or 8.1 Installation media DVD/USB

2. Copy sxs folder from source folder

3. Open CMD as admin

4. Type DISM.exe /online /enable-feature /featurename:NetFX3 /All /Source:c:\sxs /LimitAccess

Note: C:\sax is my location..You can copy sax folder from Sources to any where in your system


Wednesday, October 15, 2014

How to switch Windows 8 or 8.1 login live account into local account

Are you windows 8 or 8.1 user. Facing login issue while you are in offline (If you are connected with live account, it won't allow you login). Now we'll try this

Now i'll tell you..How to switch from live account into local account

1. Settings then select "Change PC Settings"


2. Select "Accounts" from leftpanel


3. It will open your " Linked Microsoft account" 
4. Click "Disconnect"


5. For Disconnecting your live account it'll ask "Current Password"


6. Now it'll ask for "Local account" details

 
 7. Enter those details. Then it shows "Sign out and finish"


8. it's done..


Sunday, October 5, 2014

Memory Limits for Windows and Windows Server Releases

Memory type
Limit in on X86
Limit in 64-bit Windows
User-mode virtual address space for each 32-bit process
2 GB Up to 3 GB with IMAGE_FILE_LARGE_ADDRESS_AWARE and 4GT
2 GB with IMAGE_FILE_LARGE_ADDRESS_AWARE cleared (default)
4 GB with IMAGE_FILE_LARGE_ADDRESS_AWARE set
User-mode virtual address space for each 64-bit process
Not applicable
With IMAGE_FILE_LARGE_ADDRESS_AWARE set (default):
x64:  8 TB
Intel Itanium-based systems:  7 TB
Windows 8.1 and Windows Server 2012 R2:  128 TB
2 GB with IMAGE_FILE_LARGE_ADDRESS_AWARE cleared
Kernel-mode virtual address space
2 GB
From 1 GB to a maximum of 2 GB with 4GT
8 TB
Windows 8.1 and Windows Server 2012 R2:  128 TB
Paged pool
384 GB or system commit limit, whichever is smaller.
Windows 8.1 and Windows Server 2012 R2:  15.5 TB or system commit limit, whichever is smaller.
Windows Server 2008 R2, Windows 7, Windows Server 2008, and Windows Vista:  Limited by available kernel-mode virtual address space. Starting with Windows Vista with Service Pack 1 (SP1), the paged pool can also be limited by the PagedPoolLimit registry key value.
Windows Home Server and Windows Server 2003:  530 MB
Windows XP:  490 MB
384 GB or system commit limit, whichever is smaller
Windows 8.1 and Windows Server 2012 R2:  15.5 TB or system commit limit, whichever is smaller.
Windows Server 2008 R2, Windows 7, Windows Server 2008, and Windows Vista:  128 GB or system commit limit, whichever is smaller
Windows Server 2003 and Windows XP:  Up to 128 GB depending on configuration and RAM.
Nonpaged pool
75% of RAM or 2 GB, whichever is smaller.
Windows 8.1 and Windows Server 2012 R2:  RAM or 16 TB, whichever is smaller (address space is limited to 2 x RAM).
Windows Vista:  Limited only by kernel mode virtual address space and physical memory. Starting with Windows Vista with SP1, the nonpaged pool can also be limited by the NonPagedPoolLimit registry key value.
Windows Home Server, Windows Server 2003, and Windows XP:  256 MB, or 128 MB with 4GT.
RAM or 128 GB, whichever is smaller (address space is limited to 2 x RAM)
Windows 8.1 and Windows Server 2012 R2:  RAM or 16 TB, whichever is smaller (address space is limited to 2 x RAM).
Windows Server 2008 R2, Windows 7, and Windows Server 2008:  75% of RAM up to a maximum of 128 GB
Windows Vista:  40% of RAM up to a maximum of 128 GB.
Windows Server 2003 and Windows XP:  Up to 128 GB depending on configuration and RAM.
System cache virtual address space (physical size limited only by physical memory)
Limited by available kernel-mode virtual address space or the SystemCacheLimit registry key value.
Windows 8.1 and Windows Server 2012 R2:  16 TB.
Windows Vista:  Limited only by kernel mode virtual address space. Starting with Windows Vista with SP1, system cache virtual address space can also be limited by the SystemCacheLimit registry key value.
Windows Home Server, Windows Server 2003, and Windows XP:  860 MB with LargeSystemCache registry key set and without 4GT; up to 448 MB with 4GT.


Physical Memory Limits: Windows 8
The following table specifies the limits on physical memory for Windows 8.

Version
Limit on X86
Limit on X64
Windows 8 Enterprise
4 GB
512 GB
Windows 8 Professional
4 GB
512 GB
Windows 8
4 GB
128 GB


Physical Memory Limits: Windows Server 2012
The following table specifies the limits on physical memory for Windows Server 2012. Windows Server 2012 is available only in X64 editions.

Version
Limit on X64
Windows Server 2012 Datacenter
4 TB
Windows Server 2012 Standard
4 TB
Windows Server 2012 Essentials
64 GB
Windows Server 2012 Foundation
32 GB
Windows Storage Server 2012 Workgroup
32 GB
Windows Storage Server 2012 Standard
4 TB
Hyper-V Server 2012
4 TB

Physical Memory Limits: Windows 7
The following table specifies the limits on physical memory for Windows 7.

Version
Limit on X86
Limit on X64
Windows 7 Ultimate
4 GB
192 GB
Windows 7 Enterprise
4 GB
192 GB
Windows 7 Professional
4 GB
192 GB
Windows 7 Home Premium
4 GB
16 GB
Windows 7 Home Basic
4 GB
8 GB
Windows 7 Starter
2 GB
N/A


Physical Memory Limits: Windows Server 2008 R2
The following table specifies the limits on physical memory for Windows Server 2008 R2. Windows Server 2008 R2 is available only in 64-bit editions.
Version
Limit on X64
Limit on IA64
Windows Server 2008 R2 Datacenter
2 TB
Windows Server 2008 R2 Enterprise
2 TB
Windows Server 2008 R2 for Itanium-Based Systems
2 TB
Windows Server 2008 R2 Foundation
8 GB
Windows Server 2008 R2 Standard
32 GB
Windows HPC Server 2008 R2
128 GB
Windows Web Server 2008 R2
32 GB

Physical Memory Limits: Windows Server 2008
The following table specifies the limits on physical memory for Windows Server 2008. Limits greater than 4 GB for 32-bit Windows assume that PAE is enabled.

Version
Limit on X86
Limit on X64
Limit on IA64
Windows Server 2008 Datacenter
64 GB
1 TB
Windows Server 2008 Enterprise
64 GB
1 TB
Windows Server 2008 HPC Edition
128 GB
Windows Server 2008 Standard
4 GB
32 GB
Windows Server 2008 for Itanium-Based Systems
2 TB
Windows Small Business Server 2008
4 GB
32 GB
Windows Web Server 2008
4 GB
32 GB


Physical Memory Limits: Windows Vista
The following table specifies the limits on physical memory for Windows Vista.

Version
Limit on X86
Limit on X64
Windows Vista Ultimate
4 GB
128 GB
Windows Vista Enterprise
4 GB
128 GB
Windows Vista Business
4 GB
128 GB
Windows Vista Home Premium
4 GB
16 GB
Windows Vista Home Basic
4 GB
8 GB
Windows Vista Starter
1 GB
Physical Memory Limits: Windows Home Server
Windows Home Server is available only in a 32-bit edition. The physical memory limit is 4 GB.
Physical Memory Limits: Windows Server 2003 R2
The following table specifies the limits on physical memory for Windows Server 2003 R2. Limits over 4 GB for 32-bit Windows assume that PAE is enabled.

Version
Limit on X86
Limit on X64
Windows Server 2003 R2 Datacenter Edition
64 GB
(16 GB with 4GT)
1 TB
Windows Server 2003 R2 Enterprise Edition
64 GB
(16 GB with 4GT)
1 TB
Windows Server 2003 R2 Standard Edition
4 GB
32 GB

Physical Memory Limits: Windows Server 2003 with Service Pack 2 (SP2)
The following table specifies the limits on physical memory for Windows Server 2003 with Service Pack 2 (SP2). Limits over 4 GB for 32-bit Windows assume that PAE is enabled.

Version
Limit on X86
Limit on X64
Limit on IA64
Windows Server 2003 with Service Pack 2 (SP2), Datacenter Edition
64 GB
(16 GB with 4GT)
1 TB
2 TB
Windows Server 2003 with Service Pack 2 (SP2), Enterprise Edition
64 GB
(16 GB with 4GT)
1 TB
2 TB
Windows Server 2003 with Service Pack 2 (SP2), Standard Edition
4 GB
32 GB

Physical Memory Limits: Windows Server 2003 with Service Pack 1 (SP1)
The following table specifies the limits on physical memory for Windows Server 2003 with Service Pack 1 (SP1). Limits over 4 GB for 32-bit Windows assume that PAE is enabled.

Version
Limit on X86
Limit on X64
Limit on IA64
Windows Server 2003 with Service Pack 1 (SP1), Datacenter Edition
64 GB
(16 GB with 4GT)
X64 1 TB
1 TB
Windows Server 2003 with Service Pack 1 (SP1), Enterprise Edition
64 GB
(16 GB with 4GT)
X64 1 TB
1 TB
Windows Server 2003 with Service Pack 1 (SP1), Standard Edition
4 GB
32 GB

Physical Memory Limits: Windows Server 2003
The following table specifies the limits on physical memory for Windows Server 2003. Limits over 4 GB for 32-bit Windows assume that PAE is enabled.

Version
Limit on X86
Limit on IA64
Windows Server 2003, Datacenter Edition
64 GB
(16 GB with 4GT)
512 GB
Windows Server 2003, Enterprise Edition
64 GB
(16 GB with 4GT)
512 GB
Windows Server 2003, Standard Edition
4 GB
Windows Server 2003, Web Edition
2 GB
Windows Small Business Server 2003
4 GB
Windows Compute Cluster Server 2003
32 GB
Windows Storage Server 2003, Enterprise Edition
8 GB
Windows Storage Server 2003
4 GB

Physical Memory Limits: Windows XP
The following table specifies the limits on physical memory for Windows XP.

Version
Limit on X86
Limit on X64
Limit on IA64
Windows XP
4 GB
128 GB
128 GB (not supported)
Windows XP Starter Edition
512 MB
N/A
N/A

Physical Memory Limits: Windows Embedded
The following table specifies the limits on physical memory for Windows Embedded.
Version
Limit on X86
Limit on X64
Windows XP Embedded
4 GB
Windows Embedded Standard 2009
4 GB
Windows Embedded Standard 7
4 GB
192 GB

How graphics cards and other devices affect memory limits
Devices have to map their memory below 4 GB for compatibility with non-PAE-aware Windows releases. Therefore, if the system has 4GB of RAM, some of it is either disabled or is remapped above 4GB by the BIOS. If the memory is remapped, X64 Windows can use this memory. X86 client versions of Windows don’t support physical memory above the 4GB mark, so they can’t access these remapped regions. Any X64 Windows or X86 Server release can.
X86 client versions with PAE enabled do have a usable 37-bit (128 GB) physical address space. The limit that these versions impose is the highest permitted physical RAM address, not the size of the IO space. That means PAE-aware drivers can actually use physical space above 4 GB if they want. For example, drivers could map the "lost" memory regions located above 4 GB and expose this memory as a RAM disk.

Source: www.microsoft.com