Saturday, August 15, 2015

Friday, November 21, 2014
How to get rid of junk mails

Want to get rid of unwanted subscriptions in your mail
Just follow this steps
1. open unroll.me in your browser
2. click login
Now just select whichever you want to unsubscribe ...just click unsubscribe

For video tutorial
Thursday, November 20, 2014
Want to know about your windows OS something deeper..?

How to find system information with different options
1. View "About Windows" in Windows 8 and 8.1
Open run and type "winver"
It will show windows build version and some other information about your OS
2. View "PC info" in PC settings in Windows 8.1
This will show windows produsct id and some other information
Press win+c...then select settings...then pc and devices..then pc info
3. View "System" in Windows 8 and 8.1
Right click on windows tile then select system
it will show windows and ram version details and activation details
You can open "SYSTEM Details" by pressing
win+pause/break buttons
4.View "System Information" in Windows 8 and 8.1
Open run and type "msinfo32"
It will show you system total information
5. To Display Detailed License Information about Windows
Open cmd and type "slmgr /dlv"
6.View System Information in Command Prompt
open cmd type "systeminfo"
it will show your system info
7. Last and but not least
Want to know abut DirectX verion and some other information about your PC
Open run and type Dxdiag and enter
www.youtube.com/user/techcrunch324
For video tutorial
Wednesday, November 19, 2014
How To Convert And Save Web Pages As PDF In Chrome
Google Chrome has many
features which many of us are not aware of. One such interesting feature is
chrome allows us to convert and save web pages as PDF docs. Google Chrome has
this as a built-in feature. There are various other PDF Converters that allow you
to convert and save web pages in PDF format. To convert and save web pages as
PDF you first need to install Google Chrome browser in your PC.
Follow the steps given below to convert and save web pages as PDF in Chrome:

Follow the steps given below to convert and save web pages as PDF in Chrome:
1. Open the browser Google Chrome in your PC and
go to the web page that you want to convert as PDF.
2. Now press Ctrl + P to open the Print Page on
the browser.
3. Change the Destination as
‘Save as PDF’ as shown below:
4. Now click
on ‘Save’ button and the web page will be downloaded and converted to PDF
document by Chrome. It will be saved to the location on your HDD specified by
you.
You don’t need to download and
install any third party app or any such addons on your browser to convert web
pages into PDF docs. You can use Chrome, which helps you to do the same in a
simplified manner.
Note: In
most scenario, it download PDF for news and articles from Feed i.e only text
and image.
Tuesday, November 18, 2014
How To Stop Facebook From Using Your Personal Information On Facebook Ads
All
of us like Facebook and also like to click on ‘Like’ in it. There is no problem
to ‘Like’ any of your friends’ photos, statuses, etc. Many of us are not aware
of the fact that Facebook uses your personal info such as your name, pages
which are liked by you and many of your other Facebook activities. Whenever you
browse through any app or sponsored page, the info is published by Facebook in
your friends ‘News Feed’ i.e. Facebook ads shown on left corner of the page.

Follow the steps given
below to stop Facebook from using your personal information on Facebook ads:
1. Go to ‘Account
Settings’ located at the top right corner of your Facebook page.
2. Click on ‘ Ads’
on the left side menu.
3. Now click on
‘Edit social ads setting’ in Ads and Friends section.
4. In this section
you will find at the bottom ‘Pair my social actions with ads for’. The selected
option will be ‘Only my friends’, change it to ‘No one’ and click on Save
Changes.

How to removed the crapware/Unwanted Apps on Windows New PC
Most of the new windows PC or Laptops comes with lots of
pre-installed applications. These could include applications like DVD/CD
burners, Toolbars, Gallery, Media Centers, Games, Utilities and all. Some of
them are useful and some of them are crap and take most of the space on your
Windows Drive and slow the performance of your windows PC. You can
uninstall all these application easily from the Control panel feature of the
Windows Machine, but It doesn’t tell you what a program does and which of them
are useful. Today, In this guide we’ll show you a small tool called Should I
Remove It?, which allows you to scans your computer for all its’ installed
programs and let you know which of them are good to remove and how many Should
I Remove It users uninstalled that particular program.
This program is helpful to all those user who recently bought the new PC
or laptop. All these new machines are full of Bloatware and trialware
applications. Let’s take a look how to app works on the PC and how to uninstall
the unwanted app form the new computers

How
to remove unwanted PC programs
The application is free to download
and works on all the Windows machines like Windows XP, Vista, 7 and 8. Download
the app on your desktop from the shouldiremoveit.com home page or you will find
the download link at the end of this guide. Once the application is install;ed
on your PC, run the app from your desktop, it will show you a simple list of
every program installed on your PC. See the screenshot below:-
\

In the list you will see all the apps which are installed on your PC, Click any of the
app from the list and you will see the rating of the app and how many
percentage users removed the app from their windows PC


Once you decide to remove a program,
you can uninstall it directly inside from the application screen, just click on
the uninstall button and the app will remove the selected apps from your
Windows PC. One of the best way to find all the unwanted and crap apps on the
PC.
Download Should I Remove It Windows App hereHow to Remove Write Protection from Pen Drive?
Sometimes when we try to transfer or copy some data on a USB Drive or a
memory card we get an error The Disk is Write-Protected and
you can’t transfer
data on that USB drive or pen drive. A
pen drive is write protected to protect it from unnecessary uses. This is the
very annoying and common problem faced by many users in the world wide and
unfortunately there are no such particular way to remove write protection from
Pen drive or USB drive. But if you follow some ways then you might be able to
remove write protection from Pen drive or any USB drive. If you ever face this
problem then read this post because today in this article we are going to give
you some working method to remove write protection from a pen drive or a memory
card.

Best 3 Method to Remove Write Protection from
Pen Drive
Now Follow the below
steps one by one to remove Write protection from pen drive and check if it
works for you.
Remove write protection by Registry Editor
This is one of the
oldest and working methods to remove write protection from a USB Pen drives or
a SD memory cards. In this method you need to make some changes and access
registry settings.
·
Insert write protected
pen drive on your system.
·
Open RUN by
pressing CTRL+R and type Regedit to open
windows registry editor.
·
Now find HKEY_LOCAL_MACHINE > SYSTEM > CurrentControlSet > Control
> StorageDevicePoliciesand click on it.
·
Now double click on
the Write Protect Key and in the appeared box enter
value as 0 and press OK.
·
Now remove Pen drive
and restart your system and now you are free from write protection.
Note: If there is nothing like StorageDevicePolicies then open notepad and paste
this code and save as .bat file.
cd reg add
“HKLMSystemCurrentControlSetControlStorageDevicePolicies” /t Reg_dword /v
WriteProtect /f /d 1.
Double click on .bat file and it will add the registry key
Remove write protection by Command Prompt
I f the above method
does not worked for you then you can try this method. Now follow these steps.
·
First of all go
to Run and type CMD and
Hit Enter to open commend prompt.
·
Now type DISKPART and press enter and you will see a new
window will open.
·
Now type ListDisk and press Enter.
·
After that type attributes disk clear readonly and this will clear
the write protection.
·
In this method you can
clear Read only attributes which clears all write protection value and you can
use your pen drive.
Remove write protection by Formatting Pen
Drive
When your pen drive is
write protected then you can’t format it directly from your computer. In this
case you need to follow the below steps to format your pen drive properly and
remove write protection.
· Go to Control Panel>>>Administrative Tools>>>Computer
Management>>>Disc Management from the left hand
column.
·
Now right click on pen drive and select Format and click ok.
·
Now Your pen drive
will formatted and it will remove the write protection from your pen drive
Conclusion
There are so many methods
are available to remove write protection but here we listed only best Three
working method. The methods defined here are totally different from each
other’s and may not work for you so it is advised to follow all the method.
Monday, November 17, 2014
How to install Bluestacks with bitdefender 2015
How to install Bluestacks with Bitdefender Total security 2015
Download Bluestacks
1. Download and install Uni extractor
2. Extract bluestacks...msi
3. Now open extracted folder
4. Now download and install instedIt
5. Now open Bluestacks...msi with instedIt
6. From left side select InstallExecuteSequence
7. From right side select CheckAV
8. Now change the value to inbetween 50 to 100
9. Now save the package
10. before installing we need to change the package name to Original name
11. Now Your Bitdefender is not blocking your installation
12. Now installation successfully completed
13. Now open Blustacks
Note: it's not showing after initialization screen for me...
in my case..in my laptop Nvidia graphics card is there..May problem with that
For video tutorial
Download Bluestacks
1. Download and install Uni extractor
2. Extract bluestacks...msi
3. Now open extracted folder
4. Now download and install instedIt
5. Now open Bluestacks...msi with instedIt
6. From left side select InstallExecuteSequence
7. From right side select CheckAV
8. Now change the value to inbetween 50 to 100
9. Now save the package
10. before installing we need to change the package name to Original name
11. Now Your Bitdefender is not blocking your installation
12. Now installation successfully completed
13. Now open Blustacks
Note: it's not showing after initialization screen for me...
in my case..in my laptop Nvidia graphics card is there..May problem with that
For video tutorial
Any suggestions would be appreciable .......
How to Fix Corrupt PST files in MS Outlook
If you are the victim of corrupt PST files or Outlook popping errors or its running excessively slow, then you must repair the Outlook PST files before its too late. Today most likely people use Microsoft Outlook often to send and receive mails. Due to its Flagship product from Microsoft Office, it makes the primary tool for email. It’s not just an application for managing your email but also your contact, your calendar, your tasks and notes, which are very important and cannot think of losing it. To repair or recover mails from such corrupted PST files, there are many software available, but you may have to chunk out some money from your pocket. However, before trying any paid tool to repair your PST file, try Microsoft in-built PST Scan and Repair tool called SCANPST.
What is Outlook PST Files?
Microsoft Outlook use PST files to store Outlook data, including your mails, email folder, tasks and notes, contacts and other personal data. PST Files are also known as Personal Folders and Outlook Data File.
How to Repair or Fix Corrupt PST Files
Microsoft provides the PST Repair Tool for fixing most of the problem with damaged personal folder i.e. PST Files. In order to repair your corrupted or damaged PST files, we would need to open Scanpst.exe utility that’s included by default with Outlook. This tool can also be used for email recovery while fixing the corrupt PST Files. However, accessing this tool is a bit troublesome since there is no easy shortcut to it, so you’ll need to find in Outlook Folder.

For Outlook 2010, Open the below path in explorer to find Scanpst.exe utility tool.
C:\Program Files\Microsoft Office\Office14
For Outlook 2007, Open the below path in explorer to find Scanpst.exe utility tool.
C:\Program Files\Microsoft Office\Office12
For Outlook 2003 or earlier, Open the below path in explorer to find Scanpst.exe utility tool.
C:\Program Files\Common Files\System\Mapi\1033C:\Program Files\Common Files\System\MSMAPI\1033
Step 1: Open the Scanpst.exe utility, Click on Browse and select your corrupted or damaged PST File. If you are not sure about the location of your PST Files then check below for default location of PST Files.
Windows XP
- Outlook 2007 and previous
- Outlook 2010
Windows Vista and Windows 7
- Outlook 2007 and previous
- Outlook 2010
Step 2: Click on Start to scan the PST File
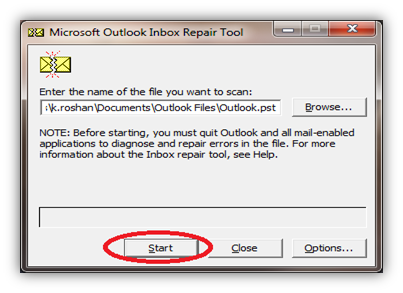
Step 3: Once Scan is completed. It will display the scanning report. If there is any issue, then it may ask you to click on the repair button in order to repair the PST file. You can also click on Details… button for more information about the error in PST File.
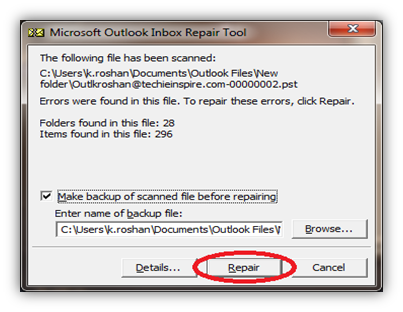
If everything goes well, you will see “Repair Complete” dialog box. Click on OK and Open Outlook. You might now be able to open your outlook with your exciting PST File. In case it fails to Repair then try again to repair the Corrupt PST File. If it again fails, you might want to try some other popular tools, which are available at very low price
Sunday, November 16, 2014
How To Turn On your Computer Using Keyboard Or Mouse
1. Power on your system and Press F2 or Delete to access BIOS setup screen.
2. Select Power Management or Integrated Peripherals and look out for the options “Power on By Keyboard” or “Power on by Mouse”

3. If you want to Power your system using keyboard then select “Power on By Keyboard”. You will see below two options to enable,
- Password: If you want to Power On your system using the keyboard, then select “Power on By Keyboard”. You will see below two options to enable.
- Keyboard 98: This can be selected for older models of keyboard.

If you want the system to Power On using the mouse, then select “Power on by Mouse” and select Double click option.

Once the setting is configured, press F10 to save the BIOS settings and Exit. In order to test, shut down your computer and press the assigned key to Power On / Turn On your computer using keyboard and mouse. System would generally be Power On without pressing the power button on CPU/tower.
How to Fake processor name
How to Fake processor name
Step 1: Go to Start –> Run –> Type "Regedit" and Press Enter.
Step 2: In Regedit, Navigate to HKEY_LOCAL_MACHINE –> HARDWARE –> DESCRIPTION –> System –> Central Processor –> 0.
Step 3: Now, On right Pane (Right Side), Find "ProcessorNameString" in name column.
Step 4: Now, Double-Click on "ProcessorNameString" and modify its value data. Change the Value Data as you wish. After Changing the value Date, Press Ok.This detail will be shown on system properties.
Note: This Changes are temporary. If you restart your System or PC, it will change to default which you had earlier.
For Video tutorial
Step 1: Go to Start –> Run –> Type "Regedit" and Press Enter.
Step 2: In Regedit, Navigate to HKEY_LOCAL_MACHINE –> HARDWARE –> DESCRIPTION –> System –> Central Processor –> 0.
Step 3: Now, On right Pane (Right Side), Find "ProcessorNameString" in name column.
Step 4: Now, Double-Click on "ProcessorNameString" and modify its value data. Change the Value Data as you wish. After Changing the value Date, Press Ok.This detail will be shown on system properties.
Note: This Changes are temporary. If you restart your System or PC, it will change to default which you had earlier.
For Video tutorial
Saturday, November 15, 2014
How to extend the life of your laptop battery

Batteries don't last
forever. Like everything except diamonds and viral tweets, they eventually wear
out. But with proper care, a laptop battery can still carry a sufficient charge
until you're ready to move on to a better laptop.
But it's a trade-off.
Taking the best care of your laptop battery just may be more of a hassle than
it's worth.
So let me start with a less
effective, but more practical approach:
When you're at home,
running the laptop on AC power, and you believe that it will stay plugged in
for a week or more, shut down the PC and remove the battery.
Then, when you need the
battery, plug it back in. If it's been more than two months since you last used
the battery, check it and charge it before taking it on the road.
Of course, you should never
remove or insert a laptop battery while the laptop is running. Always shut it
down first.
That's the practical
approach. Here's the extreme care method:
For the absolute best
results, never charge it past 80 percent or let it drop below 20 percent. When
you're working on AC power, keep an eye on the batteries charging. When
it hits or passes 80 percent, shut down your computer, remove the battery, then
reboot. When it's time to take the laptop on the road, shut it down again and
reinsert the battery.
And when you're using the
laptop on battery power, shut it down before the battery drops below 20
percent, and don't start it up again until you have AC power.
As I said, probably more of
a hassle than it's worth.
Tuesday, November 11, 2014
How to Enable Copy paste in CMD – Windows
By Default Windows do
not allow users to Copy text and Paste it in Command prompt Or Copy text from
Command prompt and paste it elsewhere. But there is an option in CMD itself to
enable Copy & Paste Text in Windows Command Prompt.
Today in this tutorial
we will learn how to “Enable Copying and Pasting Texts in Windows Command prompt”. One of the main advantage of this will be
that you can copy any command that you find on the internet or from any
word/excel file and paste it directly in CMD and execute that command just like
that.
How to Enable Copy Paste
in CMD
Step 1: Open CMD, Just type CMD in search or
Press Win + X key to select Command Prompt.
Step 2: Right Click on the Title of the CMD window and
Select Properties just like its shown in the below Picture

Step 3: You will see a Pop up Window coming up,
Now on the Right hand side, Under Edit Options, Just Check Quick Edit Mode and click OK
Step 4: Everything is Done, Now just Copy any
Text from Here or Anywhere else Using CTRL + C keys and just Right click using your
mouse on CMD. You will see that the text is been pasted automatically in CMD.
Please Understand that Using CTRL + C to Copy text is Important.
Likewise if you wish to Copy Text from CMD to paste elsewhere then Just Select the Text in CMD and
Again just Right Click with the mouse. Your Text is Copied and ready to Paste
it in any Document you want.
This Doesn’t Limit you
to just Text you can even copy File or Folder path and paste it in CMD.
Everything that you have to type manually can be copied from somewhere and
pasted directly to CMD with this small Tweak
So this was just a small Tip I wanted to Share
with my Readers so that you don’t have to Type any long Command in CMD which if
typed incorrectly can cause errors. I hope this will help some of you.
How to Activate the Hidden Administrator account
Today we going to learn how to show the hidden
administrator account in Windows. Actually this is the main admin account
when we install new Window’s. We can only operate this admin account from SAFE
MODE. But today I’m going to tell you how to show this hidden admin account on
to your log in screen.
Through User Account Control

1. Go to your Start menu and right-click on the
My Computer icon.
2. Choosing Manage from the list will prompt a
User Account Control (UAC).
3. When you are done, the Computer Management
console will appear. Expand the Local Users and Groups option with the use of
the arrow next to it and choose Users folder.
4. You can now select the Administrator Account
and go to the Actions panel to open More Actions.
5. Choose Properties to open the Administrator
Properties dialog box and uncheck the option labeled Account is Disabled.
6. When done, click OK to confirm changes.
7. The Administrator account should now be
present on your log in screen.
With Command Prompt

1. Go to your Start menu and in Accessories list,
open Command Prompt by right-clicking on its icon and choosing Run as
Administrator

2. When the Command Prompt window appears, enter
the command net user administrator
/active: yes
3. When done, log out from your current account.
Just add a No instead of yes to deactivate the account.
4. The Administrator account should now be
present on your log in screen
Subscribe to:
Posts (Atom)